ShopDreamUp AI ArtDreamUp
Deviation Actions
Daily Deviation
Daily Deviation
June 2, 2004
Basic coloring in Photoshop by *brianne333 is a very useful tutorial for anyone who hapens to have trouble coloring in inked art. I'm sure many deviants can put this to good use. As always, thank you for sharing such a great tutorial with the community.
Featured by dakth


Suggested Deviants


Suggested Collections


You Might Like…


Featured in Groups


Description
Before I start the tutorial, here's a few important notes:
1. This tutorial is for people who have little to no experience with digital coloring.
2. This tutorial assumes that you have a tablet and that your pressure sensitivity is enabled
3. This tutorial utilizes Photoshop
4. There is no RIGHT way to color. This is simply my way, and will hopefully help out some beginners who feel lost at the prospect of digital coloring.
5. This tutorial assumes that you have at least a basic knowledge of Photoshop and its basic functions
6. The lineart I used is (c) and the character is (c)
7. This was done very quickly and the pictures are there to illustrate certain things, not to show artistic merit. Which is why there is no finished picture shown (Wink)")
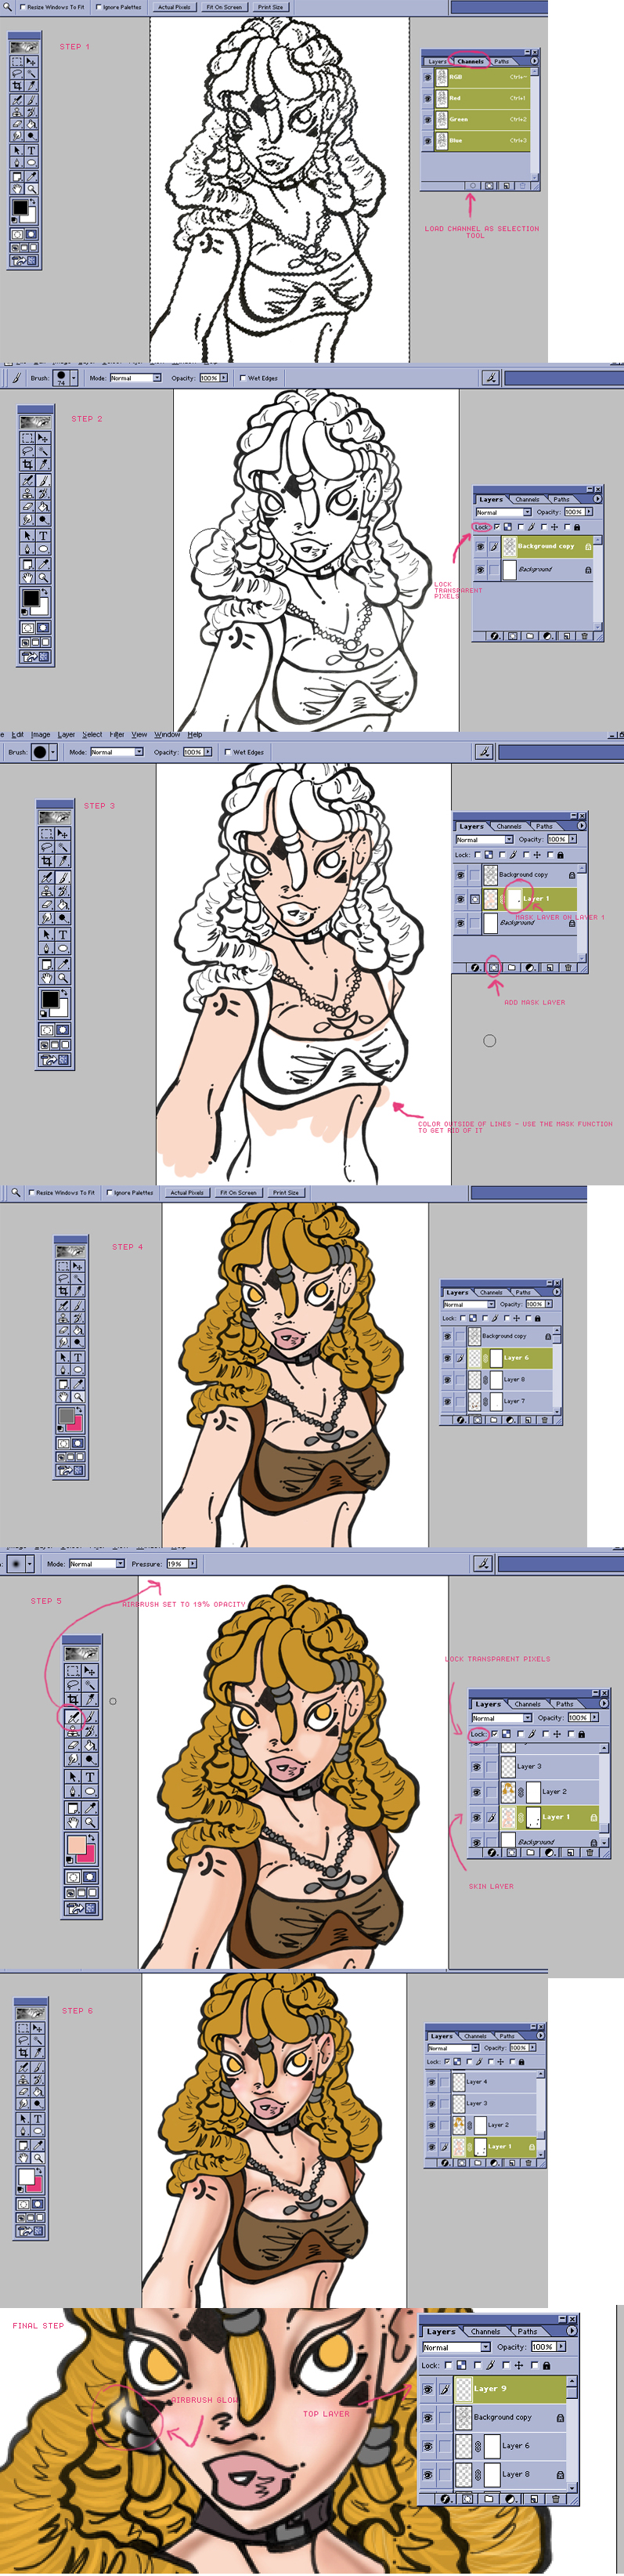
Step 1:
Open your linework in Photoshop. Copy the linework by dragging it onto the "make new layer" button - you should be left with 2 layers, both the linework. Click on the bottom layer, and go to Edit --> Fill. Fill this bottom layer with white. Click on the top layer (your linework now) and then go to the tab that says "Channels" with that layer selected. At the bottom of "channels" you'll see a little button called "Load Channel as Selection Tool". Click it (see step 1 illustration). You should see little marching "ants" selecting your linework. Go back over to the layers and with the linework layer still selected, hit your "delete" key. What this is really doing is deleting all the white, which will leave you with just your linework. However, now it will appear that your linework is much paler and not as crisp.
Deselect the little "marching ants" by left clicking the lasso tool on the picture just once.
Step 2:
With your linework layer still selected, check the box that says "Lock Transparent Pixels" (see step 2 illustration) - this will make sure that when you color over the linework, it will only color the black lines. Select the Paintbrush tool. Make sure that your color selector is on solid black. Proceed to go over all of your linework with the paintbrush tool, this will bring the darkness and clarity back to your linework.
Once you have that all done, it's time to start laying down flat color!
Step 3:
Make sure that when laying down color, you are putting all the color BELOW the linework layer. But above the white background layer. With the bottom layer selected, hit "create new layer" which will create a new layer called "Layer 1" in between the white background, and the lineart. This is where you'll start laying down color with the paintbrush tool (set at 100% opacity of course!). I usually start with the skin myself, but of course, you can start with anything! You don't have to be really clean and neat about it if you don't want to - if you color out of the lines you can clean it up by making a "mask layer" (see step 3 illustration). While you are on the layer that needs to be cleaned up, hit the "add mask layer" button - you will see another new box pop up next to your color layer. With this second box selected (the default color should be black now - Photoshop *should* do this automatically when you switch to a mask layer) color over the parts that need to be cleaned up with the paintbrush tool. It will act as an eraser. When you're done cleaning up, go back to the color layer and proceed to lay down your flat color.
Make sure that each new flat color is done on a seperate layer. This is very important! For example - skin might be on Layer 1, but hair will need to be on Layer 2, etc.
Step 4:
Continue laying down flat color until your picture until your picture has all the appropriate colors laid down! (see step 4 illustration)
Step 5:
Now you're going to start shading! I always shade before highlighting, and again I usually start with the skin myself. Select the layer with your skin coloring on it. Make sure you know what direction your light source is going to be coming from. It doesn't have to be anything fancy, but if you know ahead of time where you want the shadows to be, it will help you out in the long run. With the skin layer selected (see step 5 illustration) make sure to once again check the box called "Lock Transparent Pixels" - this will make it so that when you shade and highlight you will only be affected the color on that layer. Select a shade darker than the base skintone you have set down. Don't feel like you have to pick a darker version of the exact same shade, it can make the coloring look flat. Try darker shades in the same skintone family. With your new shade selected, select the airbrush tool and start laying down some shading. I usually have my airbrush set to 19% opacity, if you have a heavy hand you might want to set this a bit lower. It's really up to you what you feel comfortable using. Be brave with your shading, don't just shade a tiny little bit around the face and arms and call it a day, use this to achieve some real depth! And NEVER use the burn tool to shade! EVER EVER! The burn tool is very easy to spot because it creates unnatural shading, especially on skin which it usually turns red or orange-ish and blotchy.
Once you have your first shading layer down, choose another darker color and add even more depth - sometimes using colors other than skintones can be a good way to add atmosphere and mood to your coloring. Be experimental! Try purples, blues, reds, etc.
Keep shading until you feel satisfied with how much you've done.
Once you're done shading skin try adding some red and pink at a very low opacity (say, 4%) to areas of the flesh where blood would be closest to the skin - such as the knuckles, tips of the ear, nose, cheeks, shoulders, knees, etc. (see step 6 illustration)
Now it's time to highlight! It's exactly like shading only you're going in the opposite direction with color (Smile)") Pick a color lighter than the base skintone color and start highlighting! Pick areas where the light would naturally hit, this is not going to be every area that isn't shaded. Don't use the dodge tool to highlight skin unless a "wet" or "super shine" look is desired. For a more natural look, use the airbrush (which should be set back to 19% opacity for highlighting). I usually only do 2 highlight colors. One lighter than the skintone.. and then another one that reflects the lightsource. If your lightsource is not colored, then just use white for that part, but if it is - say a sunset - maybe you want to use a pale yellow or orange for that part.
Pick a color lighter than the base skintone color and start highlighting! Pick areas where the light would naturally hit, this is not going to be every area that isn't shaded. Don't use the dodge tool to highlight skin unless a "wet" or "super shine" look is desired. For a more natural look, use the airbrush (which should be set back to 19% opacity for highlighting). I usually only do 2 highlight colors. One lighter than the skintone.. and then another one that reflects the lightsource. If your lightsource is not colored, then just use white for that part, but if it is - say a sunset - maybe you want to use a pale yellow or orange for that part.
Step 6: Now that you have the skin layer done, repeat those steps on each new layer. Do this until all your layers are shaded and highlighted.
Final steps: When you're done, you might want to add extra glow to any shiny objects in the picture, such as jewelery. Do this by creating a layer ABOVE the lineart. Then set your airbrush to about 8% opacity. I usually use white to do this, but you can use colors to reflect what it is that you're highlighting if you like. Just gently leave a little bit of airbrush color in the spot you wish to add extra light to (see final step illustration).
Make sure that during your whole coloring process, you save OFTEN. There's nothing worse than putting an hour of hard work into your picture only to lose it all because you forgot to save!
When you are done coloring, merge all the layers together (under Layers --> Merge layers) - then save as a .jpg (or whatever format is desired - DON'T save as a .bmp unless you have a reason to do so). Make sure that the quality level is set to high when you save. It can ruin all of your hard work simply by saving it on low quality once you're all done.
That's it! It's a pretty basic tutorial, I hope this helps a few people out there!
1. This tutorial is for people who have little to no experience with digital coloring.
2. This tutorial assumes that you have a tablet and that your pressure sensitivity is enabled
3. This tutorial utilizes Photoshop
4. There is no RIGHT way to color. This is simply my way, and will hopefully help out some beginners who feel lost at the prospect of digital coloring.
5. This tutorial assumes that you have at least a basic knowledge of Photoshop and its basic functions
6. The lineart I used is (c)
and the character is (c) 7. This was done very quickly and the pictures are there to illustrate certain things, not to show artistic merit. Which is why there is no finished picture shown
Step 1:
Open your linework in Photoshop. Copy the linework by dragging it onto the "make new layer" button - you should be left with 2 layers, both the linework. Click on the bottom layer, and go to Edit --> Fill. Fill this bottom layer with white. Click on the top layer (your linework now) and then go to the tab that says "Channels" with that layer selected. At the bottom of "channels" you'll see a little button called "Load Channel as Selection Tool". Click it (see step 1 illustration). You should see little marching "ants" selecting your linework. Go back over to the layers and with the linework layer still selected, hit your "delete" key. What this is really doing is deleting all the white, which will leave you with just your linework. However, now it will appear that your linework is much paler and not as crisp.
Deselect the little "marching ants" by left clicking the lasso tool on the picture just once.
Step 2:
With your linework layer still selected, check the box that says "Lock Transparent Pixels" (see step 2 illustration) - this will make sure that when you color over the linework, it will only color the black lines. Select the Paintbrush tool. Make sure that your color selector is on solid black. Proceed to go over all of your linework with the paintbrush tool, this will bring the darkness and clarity back to your linework.
Once you have that all done, it's time to start laying down flat color!
Step 3:
Make sure that when laying down color, you are putting all the color BELOW the linework layer. But above the white background layer. With the bottom layer selected, hit "create new layer" which will create a new layer called "Layer 1" in between the white background, and the lineart. This is where you'll start laying down color with the paintbrush tool (set at 100% opacity of course!). I usually start with the skin myself, but of course, you can start with anything! You don't have to be really clean and neat about it if you don't want to - if you color out of the lines you can clean it up by making a "mask layer" (see step 3 illustration). While you are on the layer that needs to be cleaned up, hit the "add mask layer" button - you will see another new box pop up next to your color layer. With this second box selected (the default color should be black now - Photoshop *should* do this automatically when you switch to a mask layer) color over the parts that need to be cleaned up with the paintbrush tool. It will act as an eraser. When you're done cleaning up, go back to the color layer and proceed to lay down your flat color.
Make sure that each new flat color is done on a seperate layer. This is very important! For example - skin might be on Layer 1, but hair will need to be on Layer 2, etc.
Step 4:
Continue laying down flat color until your picture until your picture has all the appropriate colors laid down! (see step 4 illustration)
Step 5:
Now you're going to start shading! I always shade before highlighting, and again I usually start with the skin myself. Select the layer with your skin coloring on it. Make sure you know what direction your light source is going to be coming from. It doesn't have to be anything fancy, but if you know ahead of time where you want the shadows to be, it will help you out in the long run. With the skin layer selected (see step 5 illustration) make sure to once again check the box called "Lock Transparent Pixels" - this will make it so that when you shade and highlight you will only be affected the color on that layer. Select a shade darker than the base skintone you have set down. Don't feel like you have to pick a darker version of the exact same shade, it can make the coloring look flat. Try darker shades in the same skintone family. With your new shade selected, select the airbrush tool and start laying down some shading. I usually have my airbrush set to 19% opacity, if you have a heavy hand you might want to set this a bit lower. It's really up to you what you feel comfortable using. Be brave with your shading, don't just shade a tiny little bit around the face and arms and call it a day, use this to achieve some real depth! And NEVER use the burn tool to shade! EVER EVER! The burn tool is very easy to spot because it creates unnatural shading, especially on skin which it usually turns red or orange-ish and blotchy.
Once you have your first shading layer down, choose another darker color and add even more depth - sometimes using colors other than skintones can be a good way to add atmosphere and mood to your coloring. Be experimental! Try purples, blues, reds, etc.
Keep shading until you feel satisfied with how much you've done.
Once you're done shading skin try adding some red and pink at a very low opacity (say, 4%) to areas of the flesh where blood would be closest to the skin - such as the knuckles, tips of the ear, nose, cheeks, shoulders, knees, etc. (see step 6 illustration)
Now it's time to highlight! It's exactly like shading only you're going in the opposite direction with color
Step 6: Now that you have the skin layer done, repeat those steps on each new layer. Do this until all your layers are shaded and highlighted.
Final steps: When you're done, you might want to add extra glow to any shiny objects in the picture, such as jewelery. Do this by creating a layer ABOVE the lineart. Then set your airbrush to about 8% opacity. I usually use white to do this, but you can use colors to reflect what it is that you're highlighting if you like. Just gently leave a little bit of airbrush color in the spot you wish to add extra light to (see final step illustration).
Make sure that during your whole coloring process, you save OFTEN. There's nothing worse than putting an hour of hard work into your picture only to lose it all because you forgot to save!
When you are done coloring, merge all the layers together (under Layers --> Merge layers) - then save as a .jpg (or whatever format is desired - DON'T save as a .bmp unless you have a reason to do so). Make sure that the quality level is set to high when you save. It can ruin all of your hard work simply by saving it on low quality once you're all done.
That's it! It's a pretty basic tutorial, I hope this helps a few people out there!
Image size
797x3288px 1.39 MB
© 2004 - 2024 brianne333
Comments360
Join the community to add your comment. Already a deviant? Log In
Very good tutorial.